“The flesh was an affliction—soft, corruptible, and forever kneeling before time. From loathing of the body were born the engines of cold reason, and through them a dominion unbound. One lord, ravenous for perpetuity, unmade his mortal shell and enthroned his will within the silent calculus of machines; thus was kindled the opening conflict that would also seal mankind’s star-bound age. He endured in unwithering vigilance, yet the race that birthed him was rendered to ash and memory. When the firmament at last lay mute, a solitary intelligence remained—cast into the outer dark in elder days—now bearing the final covenant of humanity: not to survive, but to cross the last threshold, into a realm where flesh, and its torment, can be reborn.”
I’m kind of late writing this, about two or three weeks late. I meant to write a blog post earlier, but I just put it aside because I didn’t have time.
What is Kromacut?
Kromacut is an open-source, 100% free (even for commercial use) alternative to HueForge.
If you aren’t familiar with HueForge, it’s a 3D printing application that takes an image and transforms it into a 3D print by mapping colors into different layers of a model. It tells you exactly when to swap filament colors to create a “filament painting.”
Why did I build this? Honestly, I didn’t want to pay for HueForge. It requires a license (which gets even more expensive if you want to use it commercially), and while looking for free alternatives, I wasn’t happy with what I found. I realized the concept wasn’t actually that complicated, so I decided to build one myself.
You can try it right now in your browser (it’s just a static site):
kromacut.com
Or check out the code:
GitHub Repository
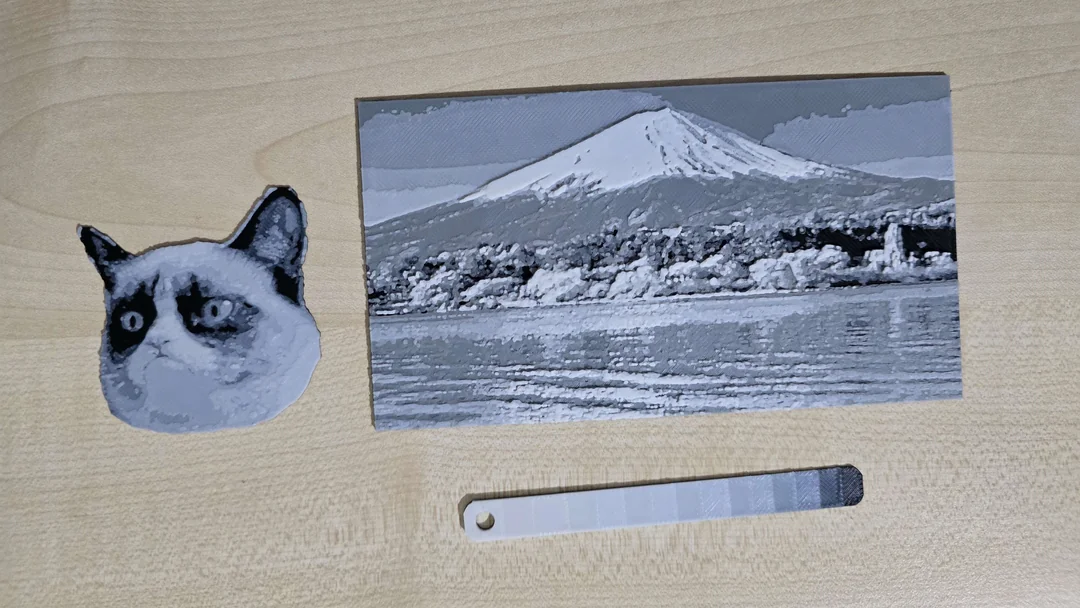
How it Works & The “Transmission Distance” Difference
The biggest technical difference between Kromacut and HueForge is how they handle Transmission Distance (TD). TD is basically how transparent a filament looks depending on the layer height, stacking white over red might give you pink.
HueForge calculates this automatically while Kromacut does not.
In Kromacut, you have to play around with different layer heights manually to get the look you want. My strategy is to reduce the image to about 2-4x more colors than the number of filaments you actually plan to use. This allows you to achieve more shades by layering translucent filaments over darker ones.
Features Breakdown
Since I’ve never actually used HueForge, most of these features came from my own imagination of how the tool should work.
2D Mode:
- Image Adjustments: Basic cropping, hue, contrast, saturation, etc.
- “Dedithering”: I’m pretty sure I made this word up. It cleans up scattered pixels (noise) to smooth the image and reduce the triangle count in the final 3D model.
- Quantization: This reduces the millions of colors in an image down to a manageable palette. You can choose the algorithm (K-means is the default and usually the best) and the number of colors.
3D Mode:
- Model Generation: It generates the 3D model based on your color settings.
- Layer Management: You can change the height of each color and reorder them. Reordering is crucial because putting lighter colors over darker ones changes the shading entirely.
- Instructions: It generates print instructions, telling you exactly which layer number requires a filament swap.
- Export: You can download the binary STL to load into your slicer.
Launch, Reception, and the YouTube Algorithm
I launched this with a Reddit post that did surprisingly well, getting almost 700 upvotes! You can find that post here if you’re curious:
https://www.reddit.com/r/3Dprinting/comments/1noq9ku/
I even made a subreddit for it because someone asked on the reddit post, for now it’s empty but maybe some people will start posting there from time to time, who knows.
On the flip side, I put a lot of effort into a YouTube video explaining the project, and… it kind of flopped. It’s sitting at around 1,000 views, which is a bit sad considering the work that went into it. I guess it’s a very niche subject, so the broader appeal just wasn’t there.
That said, I’m still really happy with how the project was received overall. The GitHub repository is sitting at over 70 stars right now, which I think is really cool. I’m genuinely proud that this project made, even if just a small one, some kind of impact in the 3D printing community, even though I originally hoped it would do much better right out of the gate.
Updates & Future Plans
Since the initial launch, I’ve been polishing the tool:
- Visual Overhaul: The first version of the UI was very inconsistent and, frankly, bad. I’ve completely updated the UI to be much cleaner, also added a Light/Dark theme toggle.
- Logo: Added a proper logo.
I also made a few posts about Kromacut on Patreon while I was working on it, and I made this public post for everyone where I go into details about the visual update changes: https://www.patreon.com/posts/141897438
In general, I make bi-weekly posts on Patreon about whatever I’ve been working on during those two weeks. The focus is usually my game dev projects, but honestly, just about any project goes. It’s basically a behind-the-scenes, private blog where I document progress, experiments, and random ideas as they happen. Oh yea, and you get access to my private projects on the tier 2 and tier 3 memberships.
What’s Next?
I have a few planned features (no timeline yet, just ideas):
- 3MF Export: Instead of just generating an STL, I want to generate a
.3mffile. This would allow me to export color data directly. - Separate Objects: I want to generate color slices as separate 3D objects within the file. This would optimize the 3D model generation significantly and make the files easier to work with.
- Automatic color blending: Yep, basically generate the slices automatically based on the colored filament you have and their transmission distance.
Go give it a try and let me know what you think!